Most backyard flocks would survive the winter without a chicken coop heater, and a badly installed one is far more likely to hurt your birds than help them. That is an odd way to open an article that recommends five of them. So let me be straight: heaters solve a narrow set of real problems, and outside those situations the money goes further on ventilation and a better roost. But surviving is not the same as being comfortable, and a flock is only as hardy as its least hardy bird.
The short answer: In my opinion, switch the heat on below 35°F (2°C) at roost height. That is the University of Minnesota’s threshold and I agree with it. Healthy birds cope down to about 14°F (−10°C), but every flock holds a few that do not, and warmer birds eat a little less. Use a radiant panel, preferably rated for zero clearance, on a thermostat, hard-mounted, never a clamp lamp. In my opinion, the best overall is the Chickcozy Smart Chicken Coop Heater 200 W.
This guide covers when a heater is genuinely justified and the five safest units you can buy. It also covers what each costs to run, and how to install one without burning your coop down.
This guide is about adult birds. It assumes fully feathered chickens that have lived outdoors through the fall, hardening off as the temperature dropped. In practice, that means point-of-lay birds and older.
Chicks are a different problem with different equipment. A day-old chick cannot regulate its own temperature at all. It needs about 95°F (35°C) at floor level in week one, then roughly 5°F (3°C) less each week. Real feathers replace the down at around six weeks. That job belongs to a brooder plate or a brooder lamp, and none of the coop heaters below is a substitute.
Six weeks is when a chick comes off brooder heat, not when it is ready for winter. A fully feathered six-week-old handles nights around 50°F (10°C), nowhere near freezing. Winter hardiness needs adult feathering plus a gradual autumn acclimatization on top.
Do your chickens actually need a heater?
This is the question that decides everything else, and it is not a straight yes or no. It is a question about where you draw the line, and how cold you are willing to let the weakest bird in the flock get.
Chickens are better insulated than you think
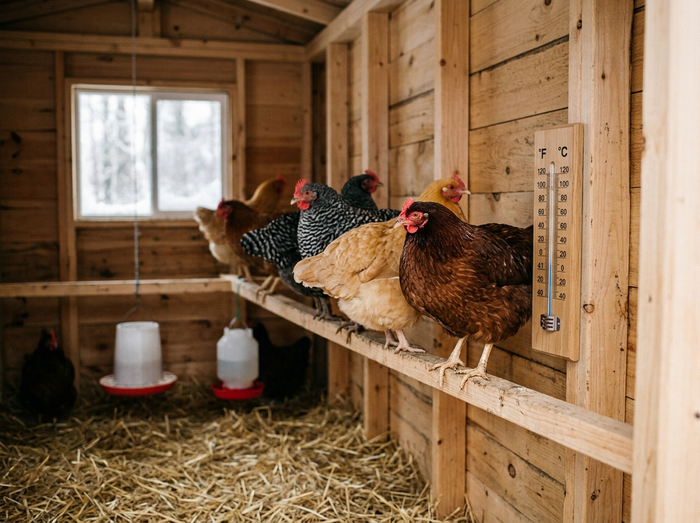
A chicken’s average body temperature is 106°F (41°C). University of Minnesota Extension notes in its guide to caring for chickens in cold weather that most poultry hold that temperature comfortably between 60 and 75°F (16–24°C). Below that, they do not simply start freezing. They fluff their down layer into a thick air-trapping blanket and tuck one foot up into their breast feathers. Roosting shoulder to shoulder, each bird only has to heat the side facing outward.
Heavier breeds handle this best. Plymouth Rocks, Wyandottes, Ameraucanas and Orpingtons over-winter well on their own. What actually kills birds in winter is almost never the raw temperature. It is damp, and it is wind.
The two extension services disagree, and the disagreement is useful
Here is something worth knowing before you spend money. Two respected university extension programs give opposite advice on this.
Minnesota says heat below 35°F. Their guidance is specific. Once coop temperatures fall below 35°F (2°C), provide supplemental heat at the height of the nest boxes or the lower rung of the roost.
New Hampshire says don’t. UNH Extension advises against supplemental heat in most circumstances, in its winter chicken care guidance. The reasoning is fire risk. Combustible bedding is everywhere, and chickens knock things over.
Both are right, and the gap between them is the fire risk. Minnesota is describing what birds benefit from. New Hampshire is describing what happens when ordinary people install heaters in wooden buildings full of dry shavings. If you can close that gap with a properly rated heater, hard mounting and a thermostat, Minnesota’s advice applies to you. If you cannot, New Hampshire’s does.
Who in your flock actually needs the heat
Bantams are the obvious case, and the one UNH Extension names. They are not the only one. A large single comb sheds heat all night. So does a bird that has not yet acclimatized, or any hen that is old, ill or recovering. In practice there are more vulnerable birds in an ordinary flock than people expect.
Bantams and light breeds. Less body mass, less feather, a worse surface-area-to-volume ratio. They lose heat faster than a Wyandotte and cannot always eat their way out of the deficit.
Large single combs. A big-combed rooster carries a thin, wet, poorly insulated radiator on his head. Combs and wattles are where frostbite lands first, and a few degrees at roost height genuinely changes the outcome.
Birds that have not acclimatized. Chickens moved from a warm climate, or point-of-lay pullets arriving in December, have not grown the down layer that makes cold survivable.
Old, ill or recovering birds. Anything already spending energy on healing has less to spend on staying warm.
Genuinely extreme cold. Sustained temperatures well below 0°F (−18°C), particularly in a coop that cannot be insulated further.
Read that list against your own birds and count. Most flocks contain at least one. You cannot give a single old chicken her own panel, so the moment one bird needs heat, the whole coop gets heat. That is the argument in a sentence: the threshold is set by the bird that needs it most, not by the flock average. Ventilation and a good roost still come first, so start by winterizing the coop properly.
The temperature band your hens actually want
Hens have a thermoneutral zone: the range in which they hold their body temperature without spending any extra energy on it. Knowing where that band sits turns “it feels cold in there” into something a thermometer can answer.
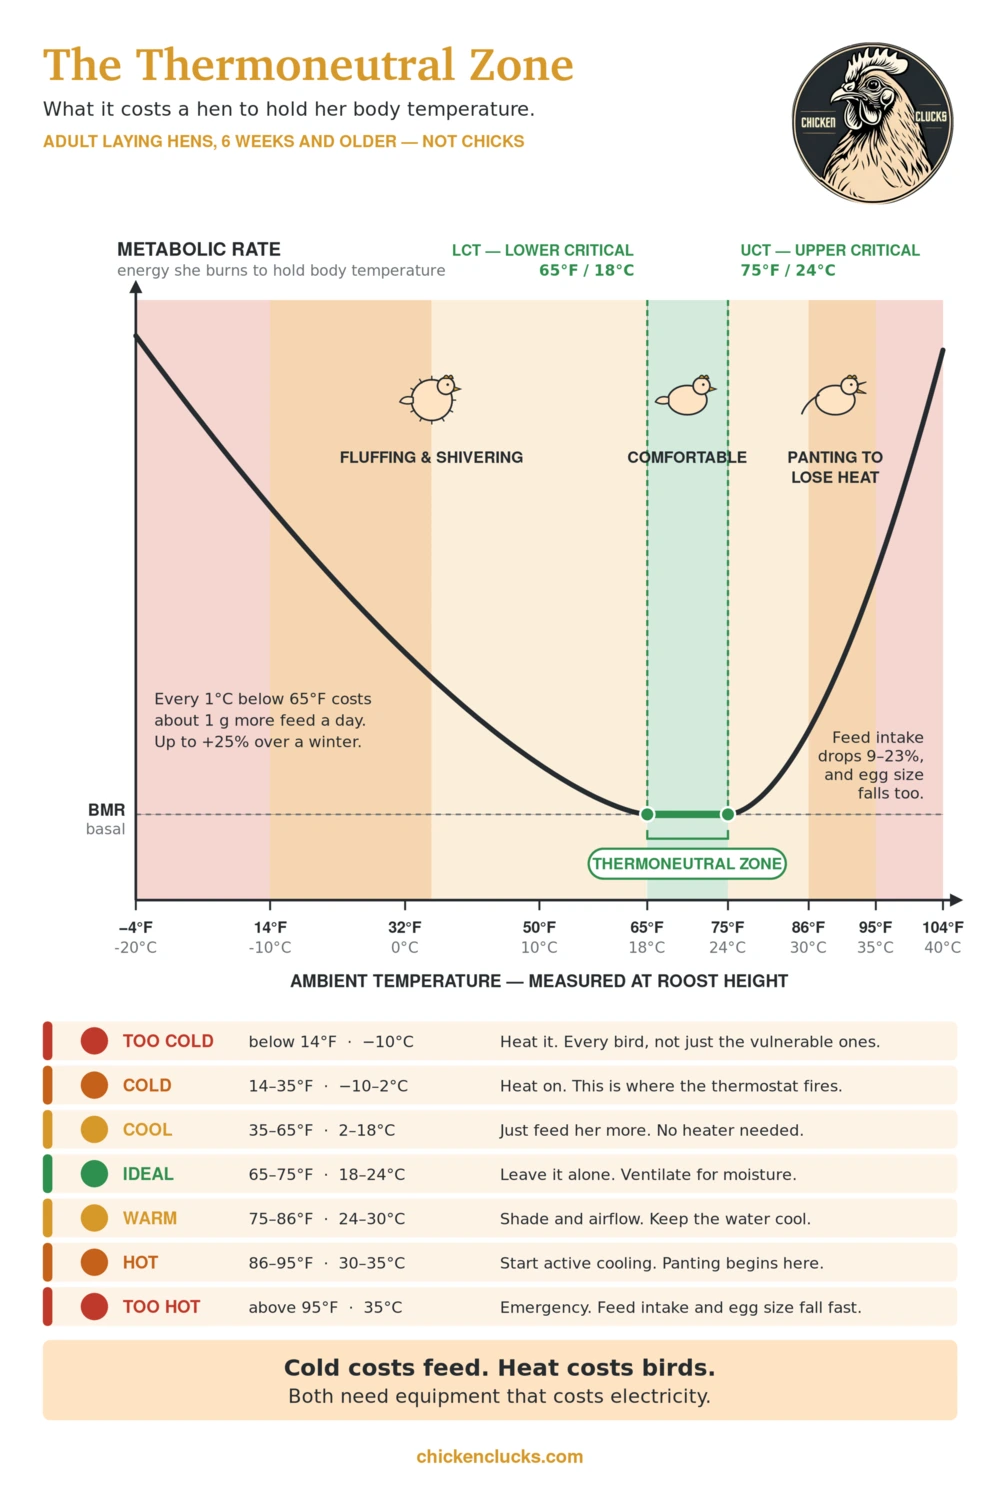
Inside the zone: 65 to 75°F (18 to 24°C)
This is the green band. Feed intake is normal, laying is normal, and the bird spends nothing on temperature regulation.
The performance sweet spot is narrower still. A review in the journal Animals on temperature and humidity in laying hens puts the optimum at 19 to 22°C (66 to 72°F). So around 68°F (20°C) is the number worth carrying in your head. Minnesota’s figure of 60 to 75°F for holding body temperature describes the same band.
Nothing is required from you in here except ventilation, and that is about moisture rather than warmth.
Below the zone: they pay in feed, not in welfare
Below the lower critical temperature of roughly 65°F (18°C), a hen stays warm by burning more energy. The rule of thumb in commercial layer management is about one extra gram of feed per bird per day for every 1°C below that point. Minnesota puts the winter increase at up to 25 percent of normal intake.
This orange band covers most of an ordinary winter, including a fair amount of frost. The birds are not suffering. They are spending, and the currency is feed.
What they need in this band is more food, dry bedding and shelter from wind, not heat. Running a heater through the whole of this range is the most common and most expensive mistake in the topic. It is also exactly what a thermostat prevents.
Below the zone: where I switch the heat on
Healthy, hardy, fully feathered birds in a dry coop cope a long way down. On the curve above, the point where cold genuinely threatens a strong bird sits around 14°F (−10°C) sustained.
That is not where I set my thermostat. I set it at 35°F (2°C), which is Minnesota’s line. For a mixed backyard flock, I think that is the right call.
The gap between those two numbers is the whole argument. 14°F is roughly the survival threshold for the strongest bird in the flock. 35°F is the comfort threshold for the weakest one. A coop has only one temperature, so the second number is the one that sets the dial.
When does cold actually become dangerous? Later than most people fear, and it depends less on the thermometer than you would expect. Chickens are kept through Canadian winters at −20°C. Some cold-climate keepers report no real distress until the coop itself drops near −20°F (−29°C). What does the damage first is rarely deep cold. It is frostbite, and frostbite is a moisture problem. Warm breath and droppings load the air overnight, the moisture settles on combs and wattles, and freezes there. A damp, badly ventilated coop can frostbite a bird at 28°F (−2°C). A dry, well-ventilated one may not at −4°F (−20°C). Watch the humidity and the wind, not the low.
That is also why Minnesota and New Hampshire appear to contradict each other. They are answering different questions: what a hardy bird can survive, and what a mixed flock is comfortable in.
Above the zone, in brief
Heat is also dangerous and deserves its own article rather than a paragraph here, so this is the short version. Above 75°F (24°C) a hen begins actively shedding heat, and panting shows up around 86°F (30°C). Between 86 and 95°F (30 and 35°C) feed intake falls by roughly 9 to 23 percent, and egg size falls with it.
In the orange band, shade and airflow do the work. In the red band you need active cooling, and cool drinking water helps more than most people expect.
Chicken coop heater types, and how they differ
Almost everything sold as a coop heater falls into one of four groups. They are not interchangeable, and the difference is simply how the heat physically reaches the bird.
Radiant panels and overhead infrared
Radiant heaters warm objects rather than air. The energy travels in a straight line from the panel to whatever it lands on: the bird, the roost, the wall. Coop air temperature barely moves. That sounds like a flaw and is actually the point, because a properly ventilated coop exchanges its air all night regardless.
This is the category worth buying. Flat panels mount on a wall or stand on feet. The good ones run cool enough to sit safely against timber, which is what a zero-clearance rating certifies. Overhead infrared units hang above the birds on chains and radiate downward.
The trade-off is coverage. Radiant heat only reaches what it can see in a straight line. A bird tucked behind a nest box gets nothing. Position matters far more than wattage here, which is what the placement diagram further down is about.
Heated perches, which work by contact
A heated roost bar warms by conduction, meaning direct contact rather than radiation. Chickens shed a great deal of heat through their feet. A roosting hen presses hers against the bar for eight hours a night. A warm bar therefore reaches exactly the tissue most likely to suffer frostbite.
This is the most targeted option on the list and the cheapest to run, typically 40 to 55 watts with a built-in thermostat. Its limitation is obvious once stated: it does nothing for combs and wattles. Treat it as a supplement to good ventilation, or pair it with a panel if you keep a large-combed rooster.
Convective heaters, which do not suit a coop
Fan heaters, oil-filled radiators and most ceramic elements work by warming air. In a house that is exactly right. In a small chicken coop it fails twice over.
First, the ventilation you need carries that warmed air straight outside, so you are heating the yard. Second, the only fix is to seal the coop. That traps moisture, lowers air quality, and can cause wet litter and all kinds of other problems. Household heaters are also built for living rooms rather than a dusty building occupied by birds. Skip the category.
Heat lamps, and why they sit apart
A heat lamp is technically radiant, so on paper it belongs in the first group. Two things separate it. The bulb runs past 400°F (204°C), hot enough to ignite litter within minutes of falling. It is also sold almost always with a spring clamp rather than a fixed mount.
That combination is why heat lamps dominate coop fire reports. The heat itself is fine. The delivery system is the problem, and a panel gives you the same radiant warmth without it.
The 5 safest chicken coop heaters compared
| Pick | Type | Watts | Surface temp | Best for | Price | Electricity cost per 24h |
| Chickcozy smart panel | Flat panel, floor or wall | 200 W | 70–190°F, you set it | Best overall | $$ | $0.88 |
| Sweeter Heater OH11x40 | Overhead infrared | 150 W | 160–180°F | Best radiant, best built | $$$ | $0.66 |
| Cozy Coop 150 W panel | Flat panel, smaller | 150 W | About 130°F | Small coops | $$ | $0.66 |
| K&H Heated Chicken Perch | Heated roosting bar | 55 W | Warm to touch | Frostbitten feet | $$ | $0.24 |
| Ceramic heat emitter | Screw-in element, no light | 100–250 W | 400°F plus | Budget, with caveats | $ | $0.44–$1.10 |
Price is what the unit costs to buy: $ is under about $50, $$ is roughly $50 to $100, and $$$ is over $100. The last column is what it costs to run for a full 24 hours at the US average residential rate of about 18.4 cents per kilowatt-hour, drawing full power the whole time. That is the worst case. Every unit here except the ceramic emitter throttles itself, and anything on a thermostat will draw a fraction of it.
Electricity costs are separate, and calculated based on maximum Wattage for 24 hours straight at the US average residential rate of about 18.4 cents per kilowatt-hour. Of course, in practice you will probably not use maximal Wattage and if you have thermostat control, also not for 24 hours straight. So, this is just a maximum indication, and the reason why a thermostat is not optional.
A Thermo Cube TC-3 plugs into the outlet, switches on at 35°F (2°C) and off at 45°F (7°C), costs very little, and in most of the country cuts run time to well under half the season. It also enforces the 35°F threshold for you, so the heater cannot quietly run through a mild week in November. You can find them as thermostatically controlled outlets on Amazon.
Sizing and choosing a heater is genuinely easier once you know how much air you are heating, so first check how to choose a chicken coop size.
1. Chickcozy Smart Chicken Coop Heater 200 W — best overall
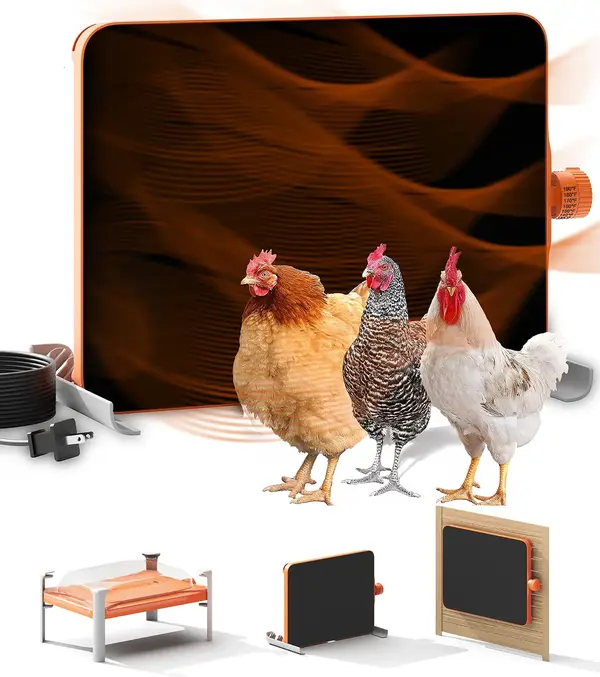
This is the default recommendation, and the one I point most people toward. It is a flat radiant panel, 16 by 11 inches (41 by 28 cm), a little over an inch thick, drawing 200 W. For adult birds you use it one of two ways: standing on its four legs, or hung on the coop wall. Standing mode needs no drilling at all, which is worth knowing if you are borrowing a coop or still moving the panel around to find the right spot. It doubles as a brooder for chicks, laid flat with the height and angle adjusted as they grow. An anti-dirt top cover comes in the box and earns its place, because a dusty panel is a less efficient one. Chickcozy states the unit is UL and FCC certified, and gives it a two-year warranty.
It heats the bird first and the room only incidentally. The effective radiant range is about 16 inches (40 cm), so it has to be near the birds: beside the roost, not across the coop. Stand three feet away and you will barely feel it. That is exactly what you want, and it is why the coop thermometer will barely move when you switch it on.
The reason it wins is the temperature sensor. It reads the surrounding air and adjusts output in real time to hold the surface temperature you set. Chickcozy asks you to keep that between 100 and 190°F (38 and 87°C) for adult birds, and treats the upper figure as a limit not to exceed. In practice the sensor means the panel works harder on a −10°F night than on a 20°F one instead of running flat out regardless, and at 200 W it comes up to temperature fast when a cold snap arrives. It will still take an external timer or thermostat, and I would add one: its own sensor holds the panel at temperature but never switches it off, so a Thermo Cube is what stops it running through a mild week in November.
One caveat. Chickcozy does not publish a zero-clearance listing the way the Cozy Coop panel further down does. Leave an air gap between the panel and any bedding or bare timber, rather than pressing it flat against a wooden wall.
Check the current price on the Chickcozy smart coop heater on Amazon.
2. Sweeter Heater overhead infrared — best radiant, best built
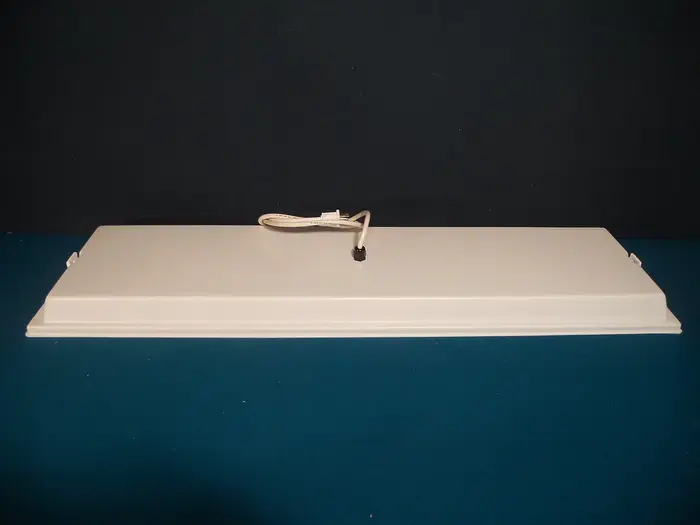
The Sweeter Heater is the one I would buy for myself, and it is the unit I have seen survive the most winters without complaint. It hangs above the birds on chains rather than mounting to a wall, and it radiates straight down. The model linked here is the overhead OH11x40: 11 by 40 inches (28 by 102 cm) and 150 W, the size that covers a full-width roost.
The specification that matters is the lens surface temperature: 160 to 180°F (71–82°C). Hot enough to warm a bird properly, not hot enough to burn one that touches it, and nowhere near the 400°F-plus a heat lamp bulb reaches. It is sealed, moisture resistant, and made to be hosed down, which matters more in a coop than most buyers expect. It is made in the USA and carries a three-year warranty, the longest here by a distance.
Hang it 6 to 20 inches (15 to 50 cm) above the birds. Smaller models exist, for example an 11 by 20.5 inch (28 by 52 cm) at 45 W, and for four birds in a tight coop one of those is the cheaper and more sensible buy.
The catch is price. It costs noticeably more than a flat panel, and you are paying for build quality and that warranty rather than for extra warmth.
Check the current price on the Sweeter Heater on Amazon.
3. Cozy Coop 150 W flat panel — best for a small coop
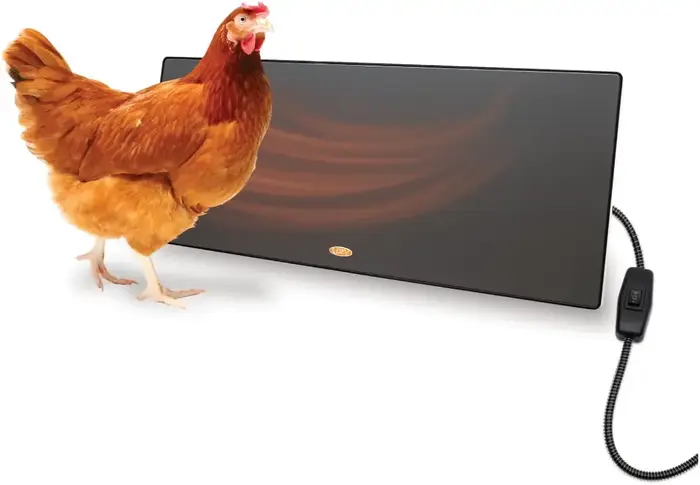
This is the one product here with the certification I actually care about. It is ETL listed and rated for zero clearance, meaning it has been tested to sit directly against a combustible surface without igniting it. That single specification removes the failure mode that burns coops down. If you are screwing a heater onto a timber wall, this is the one to screw on.
It measures 19 by 8 inches (48 by 20 cm), sits an inch off the wall or five inches deep on its feet, and draws 150 W at a surface temperature of about 130°F (54°C). The only disadvantage is that there is no smart sensor, just an in-cord switch with off, low and high. This is not a problem if the whole thing is plugged into a thermostat, that you need to purchase separately. Another weak point is the warranty: six months, against two years for the Chickcozy and three for the Sweeter Heater.
Check the current price on the Cozy Coop 150 W flat panel on Amazon.
4. K&H Heated Chicken Perch — best for frostbitten feet
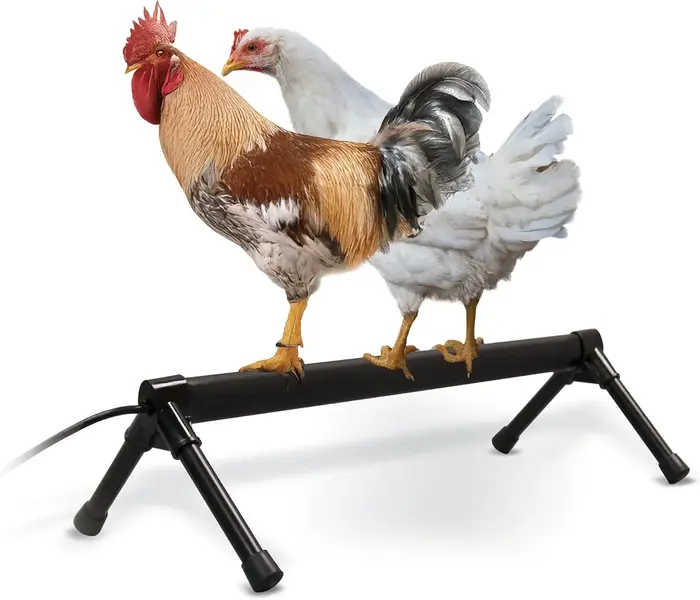
This one solves a specific problem rather than a general one, and it solves it better than anything else here. It is a heated roosting bar that replaces or supplements your existing perch. The model linked here is the large 36 inch (91 cm) at 55 W, long enough for several hens at once; there is a 26 inch (66 cm), 40 W version for a smaller flock.
Frostbite lands on feet, combs and wattles. A roosting hen already covers her feet with her body, but on a cold bar in a damp coop that is not always enough. Warming the bar itself puts the heat exactly where the vulnerable tissue is, using a fraction of the power of a room heater. The bar is oval rather than round, which is the shape a hen can actually settle on without twisting her keel.
Best of all, it manages its own duty cycle. Two thermostats inside the perch hold it at temperature day and night, and a third built into the cord reads the air and only switches the perch on below about 35°F (2°C). It enforces Minnesota’s threshold straight out of the box, with nothing extra to buy, and it puts the heat at roost height rather than up near the ceiling where it does nothing. It is MET listed, with a one-year warranty.
Worth pairing with the frostbite prevention basics in my guide to preventing frostbite in cold weather, because the perch handles feet and not combs.
Check the current price on the K&H Heated Chicken Perch on Amazon.
5. Ceramic heat emitter — the budget option, with real caveats
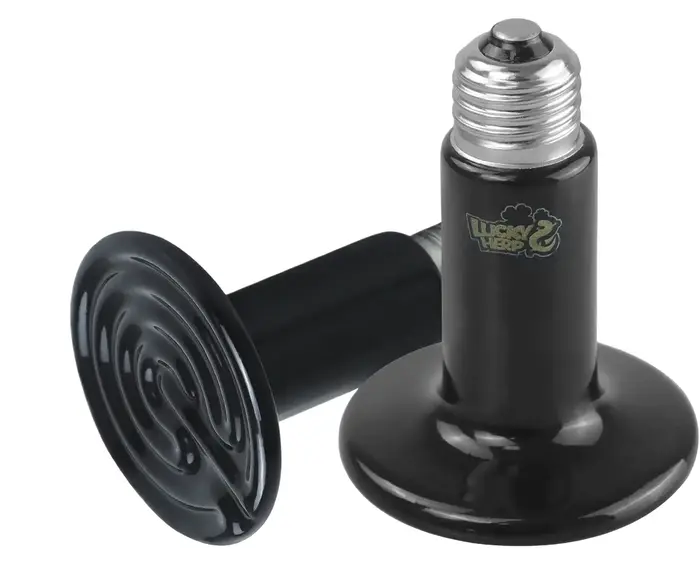
A ceramic heat emitter is a screw-in element that produces heat with no light at all. That suits a coop. It will not disrupt the birds’ sleep or push them into laying out of season. It is also by far the cheapest way to get real warmth.
I have included it fifth and with hesitation, because it keeps the component that causes fires. The emitter itself is fine; the problem is what you screw it into. A clamp lamp with a spring grip is the most common ignition source in coop fires. A ceramic element runs hotter than the bulb it replaces.
If you use one, it needs a porcelain socket rated for the wattage and a wire guard around the element. Hard-mount it with screws, or chain it to a structural member. Never a clamp. Never hanging by its cord. If that sounds like more work than it is worth, the flat panel exists for exactly that reason.
Check the current price on ceramic heat emitters and porcelain sockets on Amazon.
What about solar coop heaters?
A lot of people search for this, so it deserves an honest answer rather than a sales pitch. Solar works for keeping a small heater running. It does not work for heating a coop.
The arithmetic is unforgiving. A 200 W panel in midwinter, with perhaps four peak sun hours, yields somewhere around 600 to 700 watt-hours a day. A 200 W coop heater running overnight alone wants more than that. Battery capacity also drops 30 to 40 percent in the cold, exactly when you need it most.
Where solar does work is at the bottom of the wattage range. A 25 to 50 W radiant panel, a modest battery bank and a correctly angled array will carry a small, well-insulated coop through the night. Panel angle matters enormously in winter, far more than most buyers expect.
So if you are off-grid, size the heater first and the solar second, and accept that you are buying frost protection rather than warmth. If you have mains power available, use it.
Installing a coop heater without starting a fire
Put it at bird height, not ceiling height
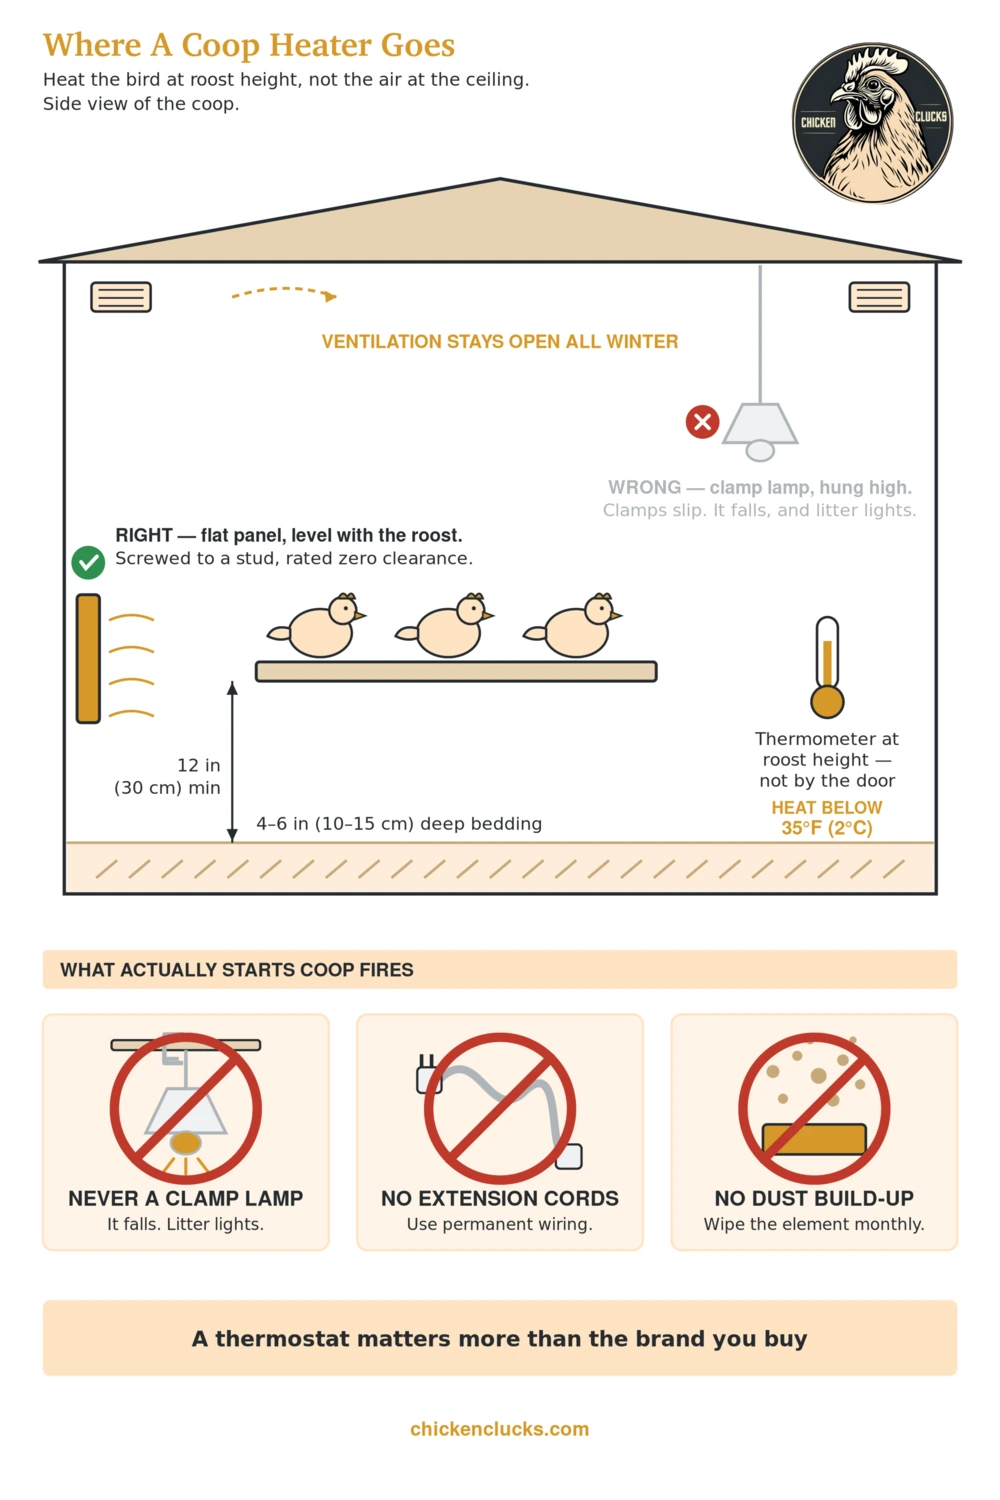
Heat rises, and a heater mounted high warms the space above your birds. Minnesota Extension is specific about this: place supplemental heat at the height of the nest boxes or the lower rung of the roost. Mount a thermometer at the same height, because that is the temperature that matters, not the reading from a gauge by the door.
Hard-mount everything, and never use a clamp
The clamp fixture is the villain in most coop fire stories. Spring clamps grip round bars poorly, the fixture and cord together act as a lever, and thermal cycling works the joint loose over weeks. Mount to a structural member with screws, or hang from chain with two independent fasteners. UMN’s guidance puts it plainly: never hang a heat lamp by the cord.
Do not run a coop on extension cords
This is the most-ignored rule and one of the most important. Extension cords are for short-term use, not for powering a building. UMN Extension is explicit that you should not use them to run power to your coop, and recommends working with a qualified electrician to install permanent supply. A coop is a damp, dusty, rodent-occupied wooden box, which is roughly the worst environment a temporary cord can be asked to live in.
Keep dust off the element
Coop dust is fine, dry and highly combustible, and it settles on everything. Shaving dust ignites more readily than the shavings themselves. Wipe the heater down monthly through the season. This is the maintenance step people skip, and it matters more than the brand you bought.
The cheaper things that work better than a heater
If you take one thing from this article, take this section. Every item here outperforms a heater per dollar spent, and the first two outperform it outright.
Ventilation beats heat, every time
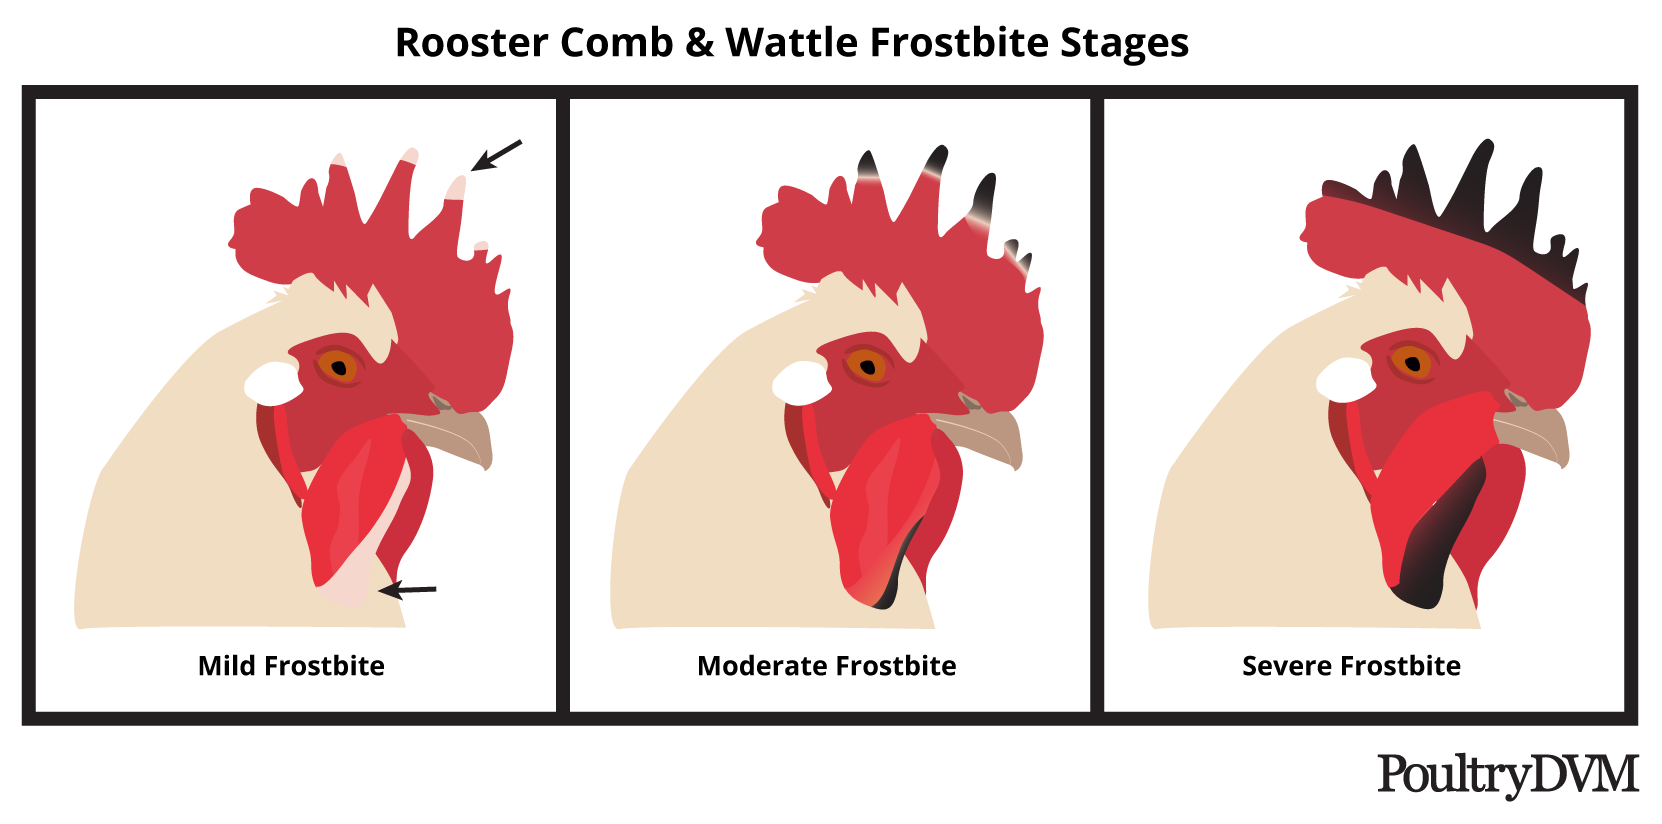
Frostbite is a moisture problem more than a temperature problem. Chicken manure is about 70 percent water, and a closed coop full of breathing birds turns into a humid box that condenses on combs and wattles. UMN Extension is direct about it: controlling moisture through airflow and manure management is critical.
The counterintuitive part is that you want ventilation high up, above the birds, running all winter. Sealing a coop tight is the classic beginner mistake and it causes the exact injury the heater was bought to prevent.
The image below can help you check for frostbite and it’s severity.
Get the roost right
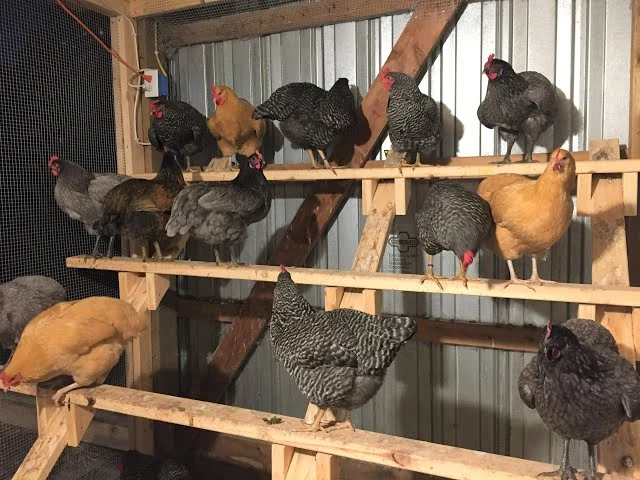
Wood, not metal or plastic, because metal holds cold against the foot. Allow around 9 inches (23 cm) of bar per bird, so they can press together. Make it 1 to 2 inches (2.5–5 cm) wide, so they can wrap their toes around it and cover their feet. At least 12 inches (30 cm) off the floor. My guide to chicken roosts and perches goes deeper on spacing and height.
Deep bedding generates its own heat
Four to six inches (10–15 cm) of straw or pine shavings composts slowly and gives off real warmth. Stir it as the top layer soils, and top it up rather than replacing it. It needs a proper clean-out in spring, and a 6 to 8 inch (15–20 cm) kickboard at the door saves you sweeping.
Feed them properly and give them water that isn’t ice
Feed intake rises by up to 25 percent in cold weather, and digestion itself generates heat. A handful of scratch grains per ten birds in late afternoon gives them something to burn overnight. Water matters more than heat: a bird that cannot drink stops eating, and a bird that stops eating cannot stay warm. That makes a heated waterer a better first purchase than any heater on this list.
What I learned the expensive way
I spent years around commercial rearing houses before keeping my own small flock, and it gave me a bad habit. In those buildings you heat the whole airspace, thermostatically. The birds never meet a cold surface.
My first winter with a backyard coop I fitted a flat panel and felt quietly pleased with myself. Then the January bill arrived. The panel had been running continuously since late October, because nothing was switching it off and I had not thought to check. Seventy dollars to warm a wooden box through a mild autumn.
The fix was a fifteen-dollar thermostat, not a different heater. I still heat, and I still set it at 35°F (2°C). The panel now runs perhaps half the winter instead of all of it. That is the mistake I see most often: people research which unit to buy for a week, then plug it straight into the wall.
Frequently asked questions
Should you put a heater in your chicken coop?
Usually not. A healthy, fully feathered, cold-hardy flock in a dry, draft-free, well-ventilated coop does not need one, even well below freezing. Consider a heater for bantams, large-combed roosters, elderly or ill birds, or unacclimatized birds — and only with a zero-clearance rated unit on a thermostat.
At what temperature do chickens need a heater?
University of Minnesota Extension puts the threshold at 35°F (2°C), measured at nest box or lower roost height rather than at the ceiling. That is the figure I use. Healthy, acclimatized birds cope well below it, but most flocks hold at least one bantam, old hen or large-combed bird that does not — and a coop only has one temperature.
What is the best heater for a chicken coop?
A radiant flat panel rated for zero clearance, such as the Cozy Products Cozy Coop, or an overhead infrared unit like the Sweeter Heater. Both warm the bird rather than the air, run at surface temperatures that cannot ignite bedding, and mount permanently. Avoid clamp-mounted heat lamps entirely.
How do Amish keep chickens warm?
They generally don’t heat at all. The approach is a tight, well-built, unheated coop with generous high ventilation. Add deep bedding that composts, cold-hardy heavy breeds, and roosts wide enough for birds to cover their feet. It works because it targets moisture and wind rather than air temperature.
Where this leaves you
Start with the things that are not a heater. Does the coop have proper high ventilation? Is the roost wooden and wide enough for a bird to cover her feet? Does the water stay liquid? Those three fix more winter problems than any panel will, and they cost less.
Then pick a threshold and hold to it. Mine is 35°F (2°C) at roost height, following Minnesota. My birds would survive a good deal colder, but the bantam and the old hen would only be enduring it, and I would rather they were comfortable.
Buy a Chickcozy smart panel or a Sweeter Heater. Mount it at roost height with screws, and put it on a thermostatic outlet. That combination is about as close to safe as coop heating gets.
For everything else that winter throws at a flock, start with my winter coop checklist or the full chicken coop guide.